Emerald Green Rooms & Details … yet another blog post!

O.k. some of you may be done with reading and seeing blogs about 2013 Pantone Color of the Year, but I really wanted to dive deep into how Emerald Green looked when applied to rooms. So here you have it, another blog about emerald green when used in rooms.

Image

Image from Chic Coles

Emerald on velvet cushions and zigzag drapes. Combined with a light french grey couch, white and dark brown. Bold and elegant palette.

Image

Image: Traditional Home. Interior Design: Christina Murphy.

Even urban environments can enjoy classical touches. Christina Murphy places Emerald chairs upholstered in white. The nails make them even more sophisticated. Here another palette that includes light grey and chocolate plus some taupe on the curtains. Pink flowers  and red artwork bring the space to live.

Image

Green Painted Stair Runner and Frames

I keep on running into beautiful stairs. The day we get a place, I will for sure focus on the stairs. They can be so much fun to design to. This beautiful green runner is complemented by dark flooring and white walls. The green frames are playful and add a family touch to the space.

Image

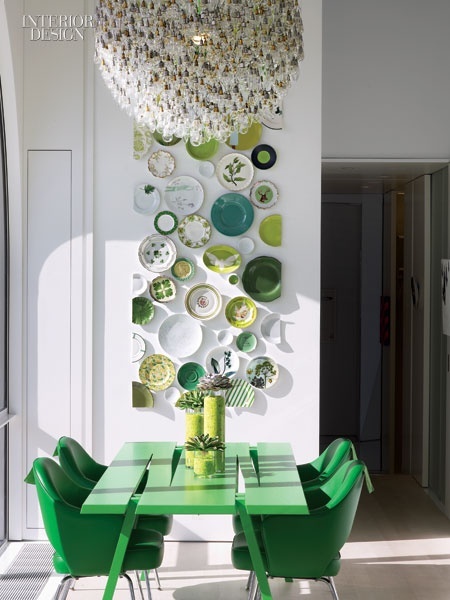
Urban dining area in Green – Interior Design Magazine

This dining area not only displays a unique print of plates reminiscent of the work of Marie Daage, but also hosts a fun dining table. The Emerald chairs seem comfortable and the chandelier magnificent.

Image

Green Sliding Barn Door. Image: TheDesignerPad

Who doesn’t love an adobe house? I can picture this space someplace in Cartagena, Colombia. The pristine white walls serve as a perfect background for this Emerald sliding barn door. Rustic meets contemporary.

Image

And I leave you with a Colombian Emerald ring because the fact that the most beautiful emeralds come from Colombia, makes 2013 a good year for Colombia.

Happy Emerald 2013 everyone!

I cut an albero’s leg

Sometimes forgetting about projects that you worked so hard, you had dreams and nightmares with is very easy.

Two years ago, I was spending long days at the DAI wood shop working on a torchiere assignment for my Rapid Prototyping class. The goal of the assignment was not only to design but also to build a lamp using CNC (computer numerical control) technology. My goal was to become familiar with the ShopBot and to make the Epilog Laser Engraver my best friend. For a whole semester, this assignment became my life, then it came with me to the four different places I lived in, until finally landing at my current “stable” home. Through all the moves, my poor torchiere survived crashes and a few parties. Today, I hugged her and decided to give her a new look by cutting 15″ off her tall leg. I am not sure if I made the best decision, but at least now she has a new look to be around for another couple of years (hopefully without moving so much). After all, a $500 torchiere should last you at least half decade right?

Let me introduce you the process of designing and building my beautiful (no joke) Albero Lamp:

Research: Understanding how a torchiere works.

Finding inspiration in the Architectural and Fashion worlds.

Study Sketches: 3-4 out of 25.

Study Sketches: 7-8.

Study Sketches: 11-12.

Study Sketches: 15-16.

Study Sketches: 19-20.

Initial 1/4" scale study models.

First 1/2" scale study model. This day was a painful one.

Finding a double layer of inspiration at the Academy of Sciences.

First full-scale prototype out of cardboard.

Expressing my love for endangered species and the epilog laser. Match made in heaven.

Finishing the Albero Torchiere. Made out of FSC certified maple appleply, brown English oak and plexiglass.

Her original height was six feet and starting today she has become a four-foot and three-quarters babe.

Happy indian summer,

~Isabel

Breeze That Indoor Hammock

What better way to enjoy those San Francisco breezy Indian summer afternoons than by laying on a hammock while drinking a mojito.

Hammocks can be beautifully used indoors as far as you pick the right color, silhouette and texture. Simply, make sure to balance the distribution of elements in your room somehow that your hammock becomes the main focal point. This will give a fun and laid-back look to any space as well as take you to a tropical inspired déjà vu.

Wilbert Das Indian House: Brazil.

Porter Hammock: Chainfall Filtered

Gary Chang tiny Hong-Kong apartment and the Hammock/Screen room

Bessudo House: Cartagena, Colombia

H & L Hammocks

The Selby Hammock

If it's too cold, then relax by the fireplace

Nu Hotel, NYC

Ratan Hanging Chair/Hammock by Tamara Magel

iDo Colombia: Week 1 at Fundación Niños de Los Andes

Did you know that your body is capable of getting used to many environments? including highly polluted ones? Yes! Finally my throat doesn’t hurt and my eyes don’t cry any more. I have assimilated Bogota’s pollution.

On Tuesday June 13th, I began to apply my design curriculum with the teenagers from the Children of the Andes Foundation. Although the first day was overwhelming and challenging, as of today, I have learned so much from the kids and am more than happy to have the opportunity of working with them.

Day 1: I introduced the kids to the world of design by presenting a visual gallery with designs made by Charles and Ray Eames, Eero Saarine, Le Corbusier, Carlos Montana, Custo Barcelona, Desigual and truly yours Isabel Perdomo. I also shared with them inspiring art by Van Gogh, Cezanne, Rodin, Botero and Guayasamin.

They thought about identification through art and design, as well as the different ways design affects their life and they affect design. At the end of the class they made road maps on how they identify themselves through design and exposed their ideas to the class.

Creating road maps in relation to Identification and Design

Day 2 & 3: I introduced them to the creative process by creating a visual gallery in which I showed my personal process to produce the Albero Lamp and the Gaudi Pen. They learned the words sketch and prototype.

After understanding the process of design, they began the sketching process in which they explored their inspirations and how they could transform them into musical instruments.

At the beginning of day 3, I showed them their constrains (exclusive materials they could use when making a musical instrument) that way they could start thinking as a designer (within constrains). In addition, I created a visual gallery with different instruments around the world that could serve as inspiration. On this day their sketches started taking a much more design oriented form. At the end of the day, we had a critique session in which each student exposed his inspiration and possible idea for his design.

Sketching and Critiquing work in order to design a musical instrument

Day 4: Today we began making the first prototype of what will be a musical instrument made with reclaimed plastic lids and leather. I showed them how to use the crop-a-dile, gave them materials to build their prototype and helped them to solve design problems.

We played music and enjoyed ourselves as we wandered around the world of design with our own hands. Today, was the most productive day and, to be honest, the most exciting. Indeed, they like to use their hands and their imagination. Some kids worked on their own, while others partnered with a close friend in order to explore and create.

Exploring, creating, working together, Designing!

Please feel free to comment and of course to follow this blog in order to receive updates of this exciting and inspiring project.

Warm regards,

Isabel

First Visit to Fundación Niños de Los Andes

Greetings from Bogotá, Colombia!

Here I am, updating you with the beginning of my Design education experience, as I try to fight what seems to be either a cold or an allergy to the Bogotanian pollution.

I arrived Bogotá on Monday June 6th at 11:30 pm, had a day to rest and today headed to two of the houses belonging to the Fundacion Niños de Los Andes. My first stop was the emergency center called Casa Corazones where I met with Martha Gozalez the Coordinator of two of the foundation’s emergency centers. She explained to me that the emergency centers were places where male teenagers stoped for a temporary period of ten days as a way to enter a rehabilitation program from being in the streets. She also made clear that most of these teenagers had problems related with substances. According to Martha, the emergency centers’ goal is to provide initial protection to these kids that is health services, food and housing. After ten days, some kids leave the house to go back to the streets, others are reintegrated to continue the temporal rehabilitation process, and some are taken to permanent centers where they begin a rigorous therapy. After introducing me to many of the educators, social workers and even cooks, she took me to where the kids were playing.

I was incredible nervous about meeting the kids I was going to have under my wing and to whom I was going to introduce to the world of design. When I saw them, they looked vulnerable and sweet at the same time. They were playing soccer under supervision of their teacher Diego. I saw many of them had beautiful bracelets, and Martha and Diego told me that the kids made those bracelets themselves. With authorization, I was able to take a few pics of those bracelets.

Manillas weaved by kids

Kids showing their manillas

They were quite excited about having me taking pictures of their “manillas”. They also asked me what was I going to be teaching them. After I told them Design, they got happy and started asking me if I could teach them how to take photographs as well. Of course I will!

Martha suggested me to focus on transcending from the idea of creating a product to the idea of sensibilizing the teenagers. She made me aware that my work could be therapeutic, and I could help them become aware that by staying in the program they could have better dreams for themselves. Finally she made emphasis in the importance of collecting their opinion on the workshops, that way I could make changes accordingly.

Tomorrow I’ll be back at the house to prepare materials and see what I need to buy, and thanks to all the donations I have received, I will be able to buy what’s necessary, important and even exiting for them. Again Muchas Gracias for all your help.

See you next week with an overview of the beginning of the workshops.

iDo Colombia – Segunda Parte

Done and done with classes . Now my main focus is to continue the development of my graduate creative work. That is: iDo Colombia, Industrial Design Outreach for at risk teenagers in Bogota, Colombia. In less than a month, I’ll … Continue reading

DIY Living Wall

Busy busy busy, that is all I have to say. I hope you enjoyed the bus shelter entry from last month. Here I am again with some fascinating design solutions. Along with Elsa Chen a peer Design and Industry student … Continue reading

Fascinating Bus Shelters

Friday night, over a refreshing glass of Ichigo and some Kobe Beef asparragus, my boyfriend and I discussed the future of my creative work. After sketching and drinking away, we realized that there is more to furniture design than what we thought. By the end of the night, we have acknowledged the intricate components of bus shelters.

Bus shelters are structures that while being in the outside, provide protection and a sense of either safety or danger (depending of the design and the area where they are located). Bus shelters host furniture, reflect culture and meet human needs, not to mention their environmental importance.

Through the weekend, I decided to look a bus shelters over the world and have chosen the ones I find most fascinating. Here is to the beauty and importance of bus shelters:

  • Curitiba, Brazil. A futuristic design that proved to enhance the “public transportation” experience.

  • Casar de Caceres, Spain. What looks like a single sheet of concrete is a embracing structure designed by architect Justo García Rubío.

  • Athens, Georgia. American sculptor Christopher Fennel uses parts from decommissioned school buses from the 60s and 70s, to create a fully recycled shelter.

  • Dubai became the first city in the world to offer the luxury of air-conditioned bus shelters for passengers. The goal was to lure people into using public transportation in order to ease the pressure on the roads.

  • Sheffield, England. Green roof shelter. Soon we shall see urban gardens on the roofs of shelters.

  • Paris, France. Designed as part of the smart mobilities project, this bus stop was presented in 2008. Users waiting inside the bus stop could engage via a touch screen interface while pedestrians waiting outside could interact with a 6ft. custom LED display.

  • Victoria, Canada. The Victoria Bug Zoo is all about experiencing the world of insects and spiders. This ad is made from a plastic sheet with hundreds of small magnifying lenses, allowing passersby to see through a bug’s eyes.

  • Landshut, Germany. Design by Hild und K Architeckten. A computer-controlled high-energy laser beam cuts the chosen pattern in the Corten steel sheet. After cutting, the sheet is simply folded into a bus shelter. The internal panes of glass were fitted on the spot.

  • Scottsdale, Arizona. “Wavelength” bus shelter by artist Kevin S. Berry.

  • Sao Paolo, Brazil. Bus Sheleter for world cup. A whole soccer arch for you to inhabit.

  • London, England. Bus shelter modified by Bruno Taylor gives commuters a chance to have a little bit of playtime during their morning commute. He went and attached swings to a number of bus stops around the city.

My next step is to go around different high schools in the city and take pictures of near by bus shelters in order to see how well identified students are, as well as how inspired they may be to take public transportation.

Till next time …

Rock-N-Roll sew that beer koozie

Wednesday night, I had the opportunity of taking a Rock-N-Roll Sewing for beginners class at Workshop SF and have to admit having a fabulous time learning how to use a sewing machine while listening to old Rock-N-Roll.

Caitlin our teacher is a rad fashion designer and entrepreneur graduated from CCA with a hard rock style and great sense of humor. In class, we learned the anatomy of a sewing machine, how to thread a bobbing and basically roll and rock our creativity with the sewing machine.

By the end of the three-hour class we had learned how to make a beer koozie and a secret pocket to place inside a pillowcase. “A pocket for what? Extra lighters, secret stash, late night “protection”, trapping the tooth fairy ” you name it.

Root Beer Koozie

Workshop SF is an eight-hundred square foot space on McAllister and Baker in San Francisco. It offers DIY classes taught by fabulous, creative folks from the Indie Mart, local designers, and, Kelly Malone (owner). “Classes range from the single class for the commitment-phobics, to the more detailed, multi-day classes for those truly desiring to learn their craft. Workshop is equipped with a complete silk screening facility, sewing machines, button machines,and lots of tools for cutting, printing, building, and making. Workshop also offers a library stocked with how-to books, design books, and old magazines to turn the light bulb over your head to ON”

My class was from 7:30 pm to 10:30 pm, and I must admit, those have been some of the most productive and fun hours of my summer. Indeed, I plan on coming back to take Sewing 102: Alterations And Reconstruction or How To Sew: Simple Denim Totes and Hobo Bags, and why not Indie Biz 101: Starting In The Design Business.

Visit their blog for other super creative activities.

Till next week,

Isabel